Mastering JSDoc for React Native Projects

Documentation is a key part of any software project, and for React Native projects, having well-documented code can greatly improve maintainability and collaboration. JSDoc is a popular tool for generating documentation from JavaScript comments. In this guide, we’ll walk through how to set up and use JSDoc in a React Native project.
What is JSDoc?
JSDoc is a documentation generator for JavaScript, which parses comments in your code and produces HTML documentation. It supports various annotations to document functions, classes, parameters, and more.
Why Use JSDoc in React Native?
Improves Code Readability: Clear documentation helps developers understand the purpose and usage of functions and components.
Facilitates Collaboration:Teams can collaborate more effectively with a shared understanding of the codebase.
Automates Documentation: Keeps your documentation up-to-date as your code changes.
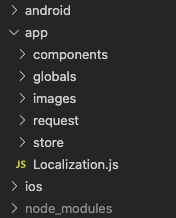
Setting Up JSDoc in a React Native Project
1. Install JSDoc
First, you need to install JSDoc. You can add it as a dev dependency in your project using npm or yarn:
npm install - save-dev jsdoc
 or
yarn add - dev jsdoc
2. Configure JSDoc
Create a configuration file for JSDoc, typically named `jsdoc.json`. This file allows you to customize the documentation generation process. Here’s a basic example:
{
 "source": {
 "include": ["src"],
 "exclude": ["node_modules"]
 },
 "opts": {
 "destination": "./docs",
 "recurse": true
 },
 "plugins": ["node_modules/jsdoc-export-default"],
 "templates": {
 "theme": "journal"
 }
 }
In this configuration:
- `source.include` specifies the directories to include.
- `source.exclude` specifies the directories to exclude.
- `opts.destination` is the output directory for the generated documentation.
- `opts.recurse` tells JSDoc to process files in subdirectories.
- `plugins` can be used to extend JSDoc functionality.3. Document Your Code
Use JSDoc comments to annotate your code. Here’s an example of how to document a React Native component:
/**
 * A button component for submitting forms.
 *
 * @component
 * @example
 * const handleSubmit = () => { ... };
 * return <SubmitButton onPress={handleSubmit} />;
 */
const SubmitButton = ({ onPress }) => (
  <Button title="Submit" onPress={onPress} />
);

/**
 * @param {function} onPress - Function to call when the button is pressed.
 * @returns {JSX.Element} A button element.
 */
SubmitButton.propTypes = {
  onPress: PropTypes.func.isRequired
};
In this example:
- The component-level comment provides a high-level description and usage example.
- The `@param` tag documents the `onPress` prop, including its type and purpose.
- `@returns` describes what the component returns.4. Generate Documentation
Run JSDoc to generate the documentation. You can add a script to your `package.json` for convenience:
"scripts": {
 "docs": "jsdoc -c jsdoc.json"
 }
Then, generate the documentation by running:
npm run docs
 # or
yarn docs
This command will create documentation in the `./docs` directory as specified in your `jsdoc.json`.
5. View and Share Documentation
Open the generated HTML files in a web browser to view your documentation. You can also host it on a web server or share it with your team.
Best Practices
Keep Comments Up-to-Date: Regularly update JSDoc comments as your code evolves.
Use Descriptive Tags: Use tags like `@param`, `@returns`, and `@example` to provide clear and useful information.
Leverage Plugins: Explore JSDoc plugins to enhance your documentation with additional features.
Conclusion
Using JSDoc in a React Native project can greatly enhance the clarity and maintainability of your code. By following these steps, you’ll be able to create comprehensive and useful documentation that benefits your entire team. Happy documenting!