React Native : Subscriptions, In-App Purchases & Service Fees (Android & IOS)

What is In-App Purchase?
In-app purchasing refers to the buying of goods and services from an application on a mobile device. In-app purchases mean developers can provide their applications for free, but then advertise paid upgrades, feature unlocks, special items, or even ads other apps and services, to users. This allows the developer to profit despite giving the basic app itself away for free.
What is Subscription?
Subscriptions give people access to virtual content, services, and premium features in your app on an ongoing basis. An auto-renewable subscription continues to automatically renew at the end of each subscription period until people choose to cancel it. Users can use these items for a fixed period of time, with an option to purchase again when the period ends.
Types Of In-App Purchases
In-app purchases include:
- Consumable: For example, game currency, health, and hints. Users need to buy these items repeatedly, every time they want to use them — they cannot be used in the future for free. On reinstalling or changing device the user may lose their consumable product.
- Non-consumable: For example, upgrading the app to the pro version or removing ads. Users buy these items once and they can then be used on an ongoing basis, for free. On reinstalling or changing devices these products are retained — if the user loses their non-consumable item, they may be able to download it again for free by restore in-app purchases.
- Non-renewing subscriptions: For example, a sport session pass for one, three, or six months. Users can use these items for a fixed period of time, with an option to purchase again when the period ends.
- Auto-renewable subscriptions: Users can buy these items for a specified period of time, they’ll automatically renew when the period has passed. For example, ongoing services (Netflix, Hulu Plus, etc), or magazine subscriptions.
In-app purchase product creation
For in-app purchases you need products to offer to the user — a subscription, or some coins — which you present to the user in the app.
Think of products as different packages which you show to the user to purchase. So, you should create one or two or more products in iTunes Connect for iOS and Google Play Store Console for Android.
To enable in-app purchase for your app you should have iTunes Connect account for iOS and Google Play Store Console account for Android.
Let’s start implementing in-app Purchase in our application. Here are the steps we have to follow:
- Configure in-app purchase on Google Play Store Console.
- Configure the
react-native-iaplibrary in React native.
1. Configure in-app purchase on iTunes Connect (for iOS)
Important: Before you can create your In-App Purchases, you’re required by Apple to request and fill out their Paid Applications contract.
Log in to your App Store Connect account here
https://appstoreconnect.apple.com/
Go to the “Agreements, Tax, and Banking” section. You’ll see the link to request the paid applications contract towards the top of the page.
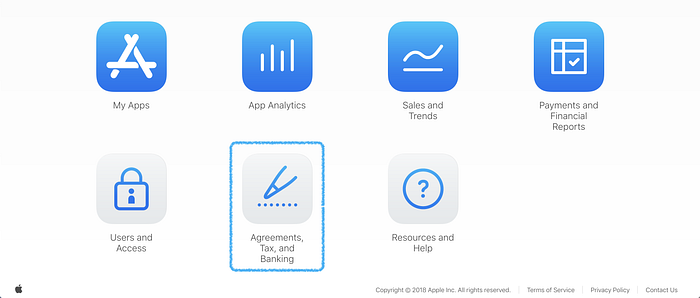
Request and fill out the paid applications contract.
This is very important. You need the paid applications contract in place before Apple will allow you to charge for in-app purchases. Make sure you fill out all of your Contact, Banking, and Tax information. If any of these are not filled out, the contract with Apple is not completed, so In-App Purchases will not work.
Now that you have your paid applications contract filled in, you need to add the products (the in-app purchases) to your app listing.
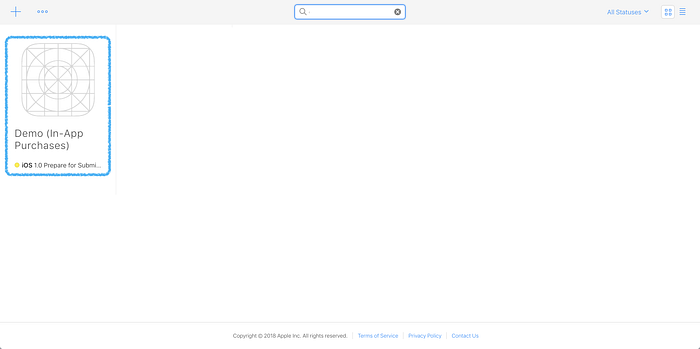
Go to the “My Apps” section of your “App Store Connect” account.

Click on your app to step into its listing.
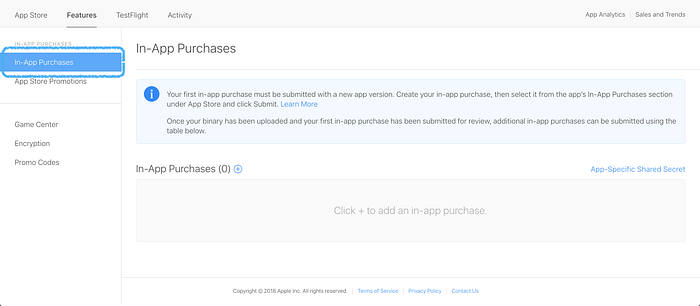
Select “Features” from the menu towards the top.
Make sure that after clicking the “Features” tab you are in the “In-App Purchases” section on the left-hand menu.
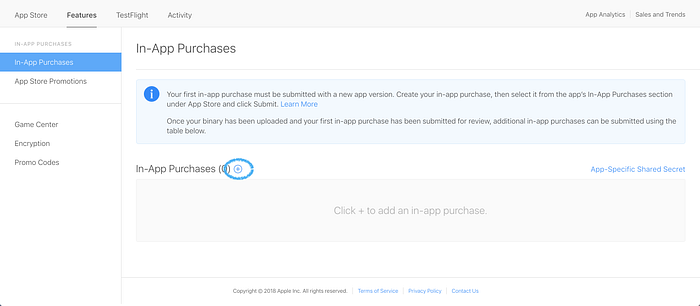
Add an in-app purchase product by selecting the (+) button.
Select the “Non-Consumable” type and click “Create.”
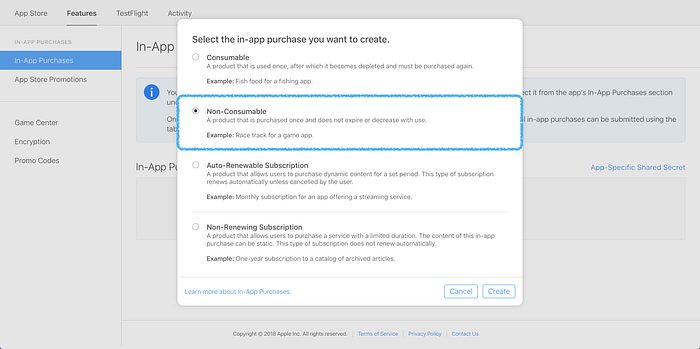
Select according to your requirement — it depends on the type of product you want to create.
Enter a reference name and product ID. It’s a good idea to enter a reference name that clearly tells you what in-app section this specific purchase will unlock. Also, make note of the product ID you enter since you will also need to enter the product ID on your app control panel.
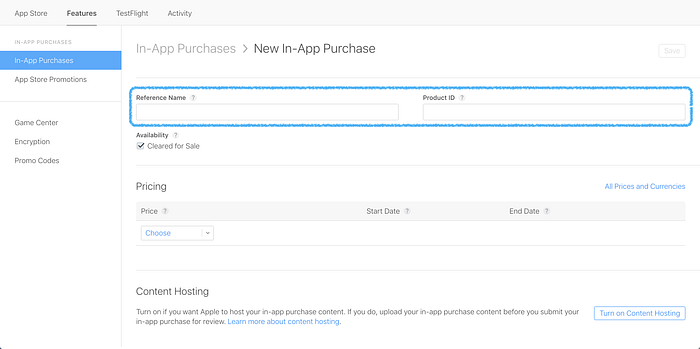
Select the price you want to charge for this specific purchase.
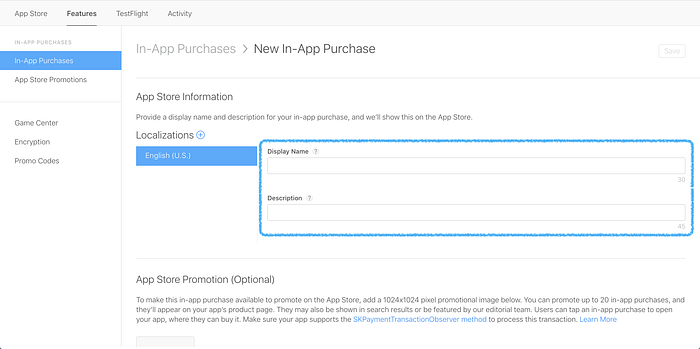
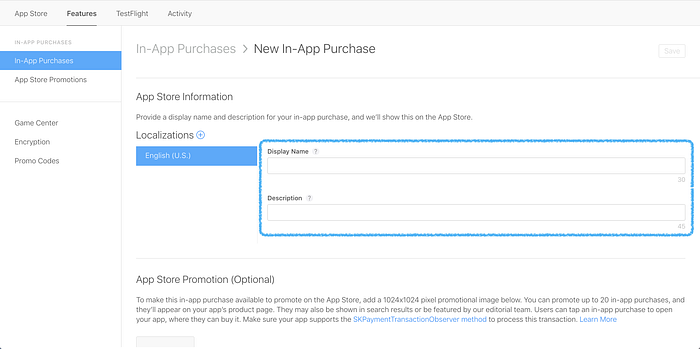
Enter the App Store information for this purchase. This is the information that will be visible on the App Store.
Enter the purchase’s review information. The screenshot (requires at least 640 x 920 pixels) and the information you provide will not be shown on the App Store — it is only for Apple’s review purposes.
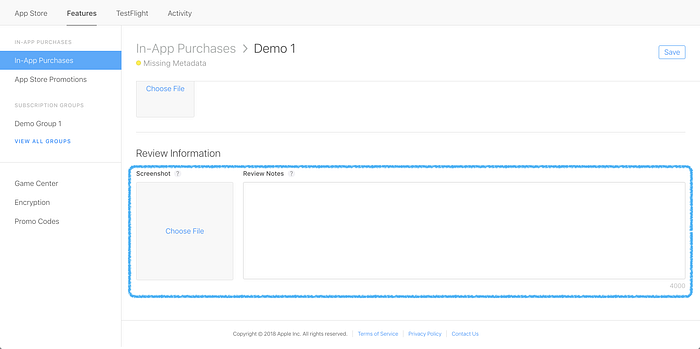
Click “Save” in the upper-right hand corner.
Now that you have your In-App Purchase created, you need to add the Product ID to your app’s control panel.
In your app control panel, go to the “Commerce” section from the menu on the left.
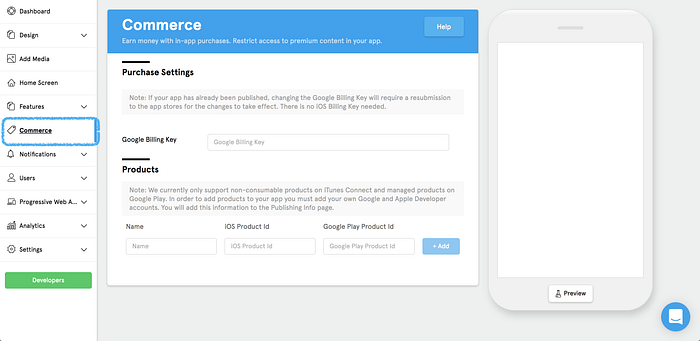
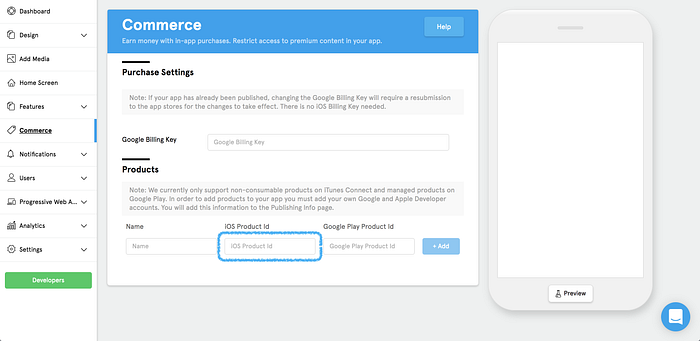
Copy and paste the product ID from your App Store Connect account which you added to the iOS product ID field
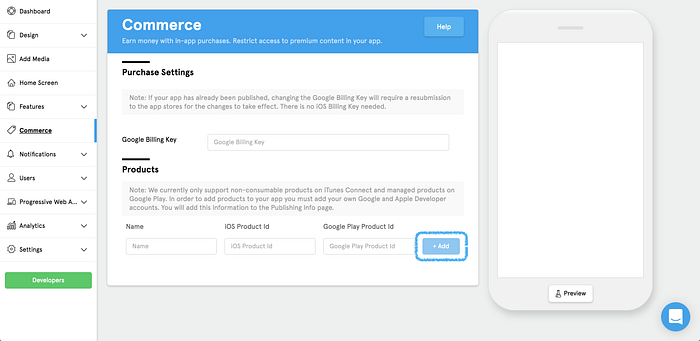
Once you’ve entered your product IDs, click the “Add” button to save.
One final thing that you have to configure in XCode settings, open XCode and select project and go to Capabilities section and enable InApp Purchase button.
2. Configure In-App Purchase on Google Play Store Console
IMPORTANT: Before you can create your In-App Purchases in android, you are required to activate a Merchant account in your Google Developer account.
Log in to your Google Developer account here: https://play.google.com/apps/publish
Click the “Settings” tab from the menu on the left.
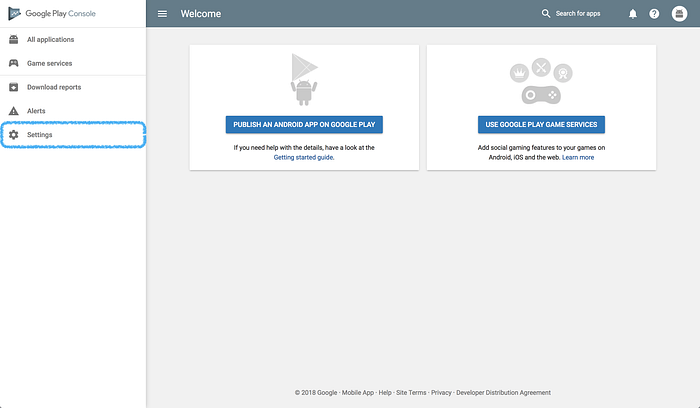
Scroll to the bottom of this page and you’ll see a link to activate your Merchant account.
When you’ve activated your Merchant account it will look like this:
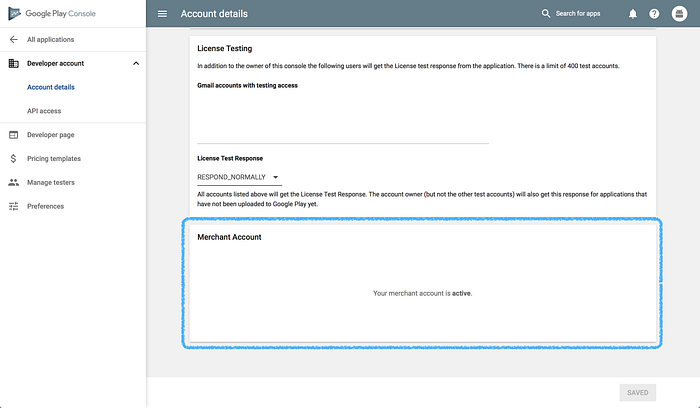
Now that you’ve activated your Merchant account, you’re required to obtain your license/billing Key from your Google Developer account.
From the menu on the left, select “All Applications”, then click on the app that you’re going to apply the in-app purchases to:

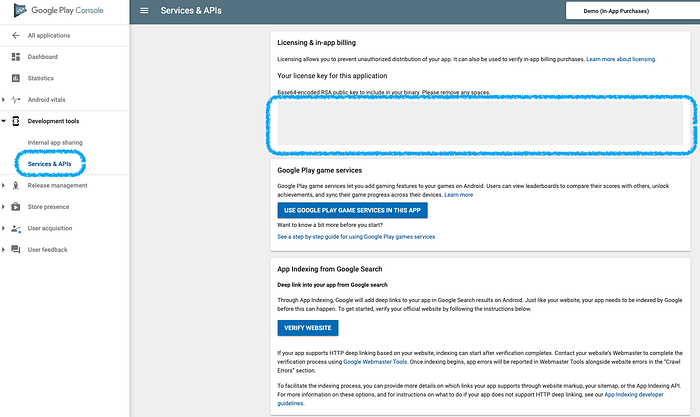
From the menu on the left select “Services and APIs” found under “Development Tools.”
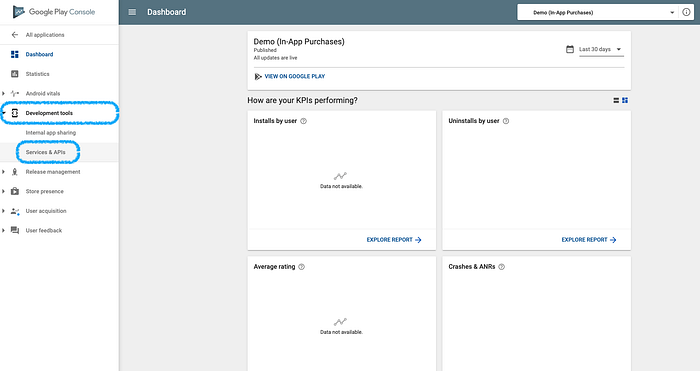
Copy the license key in the section titled “Your license key for this application.”
Upload your license/billing key to the Commerce section of your app’s control panel.
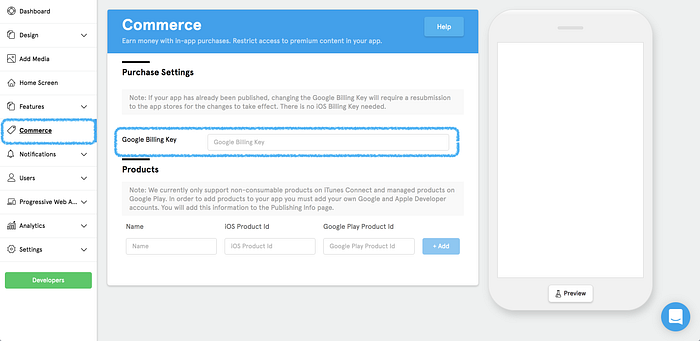
Now you have your Merchant account activated and your license/billing Key uploaded.
Click on your app listing.

Click the“In-App Products” tab from the menu on the left.
If your app was already live on the Play Store and you’re just now including In-App Purchases, the In-App Products section is found under the Store Presence tab of your app’s listing.
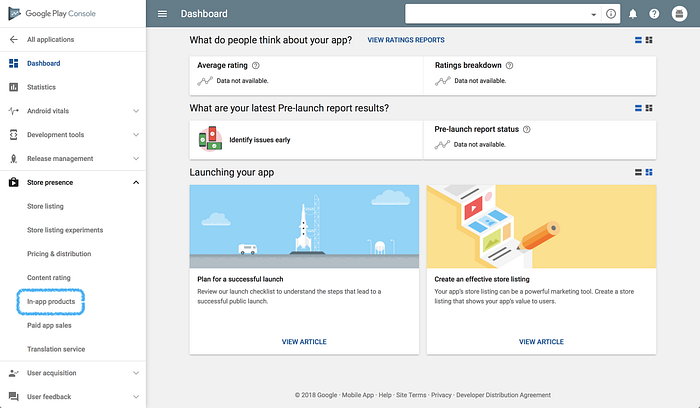
Make sure you have “Managed Products” selected, then click “Create Managed Products.”
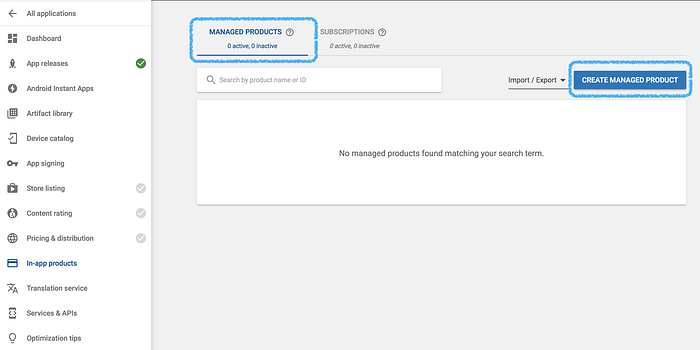
Input your Product ID.

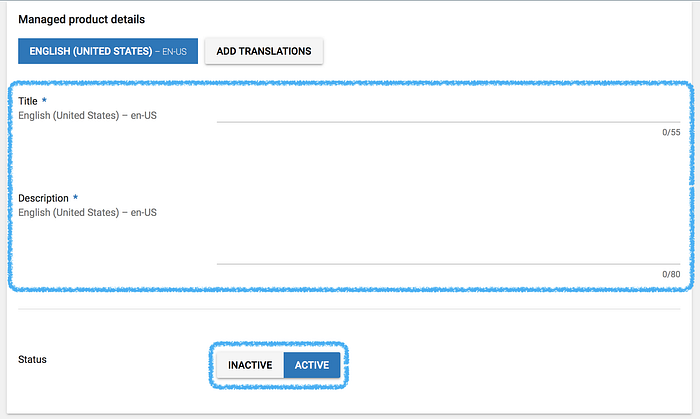
Input your title and description, then change the status to active.
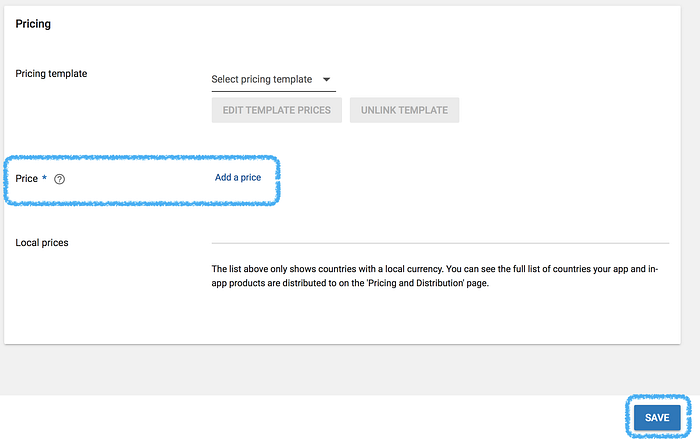
Set a price, then click “Save” at the bottom of the page.
Now that you have your in-app purchase created, you need to add the product ID to your app control panel.
In the app control panel, go to the commerce section from the menu on the left.
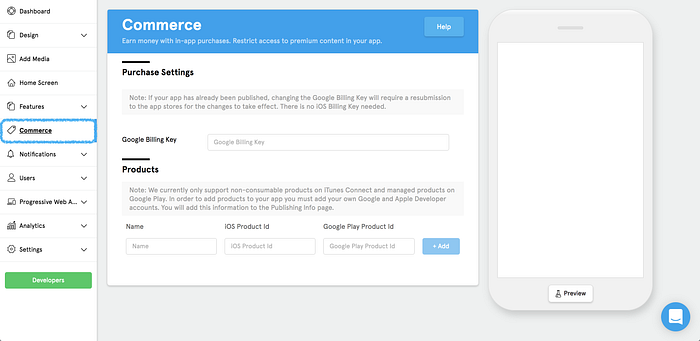
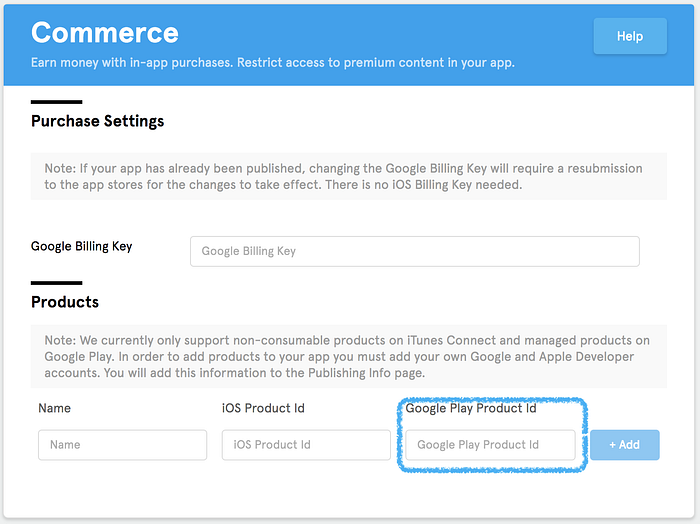
Copy and paste the Product ID from your Google Developer account which you entered previously into the Google Play Product ID field.
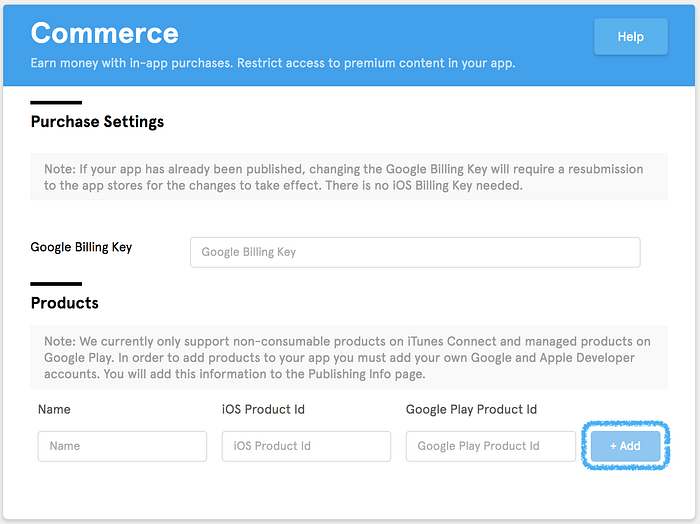
Once you have entered your Product IDs, click the “Add” button to save.
One more thing that you must configure in Android: You have to submit an alpha or beta release with the following permission in Android Manifest.xml:
<uses-permission android:name=”com.android.vending.BILLING” />3.Install package react-native-iap library in React native
yarn add react-native-iap or npm install react-native-iapcd ios && pod install //For IOS
Usage
You can look in the RNIapExample/ folder to try the example. Below is basic implementation which is also provided in RNIapExample project.
Init IAP, In App Billing
First thing you should do is to define your items for iOS and Android separately like defined below.
import * as RNIap from 'react-native-iap';const itemSkus = Platform.select({
  ios: [
    'com.example.coins100'
  ],
  android: [
    'com.example.coins100'
  ]
});
Get Valid Items
To get a list of valid items, call getProducts().
You can do it in componentDidMount(), or another area as appropriate for you app.
Since a user may first start your app with a bad internet connection, then later have an internet connection, making preparing/getting items more than once may be a good idea.
Like if the user has no IAPs available when the app first starts, you may want to check again when the user enters your IAP store.
async componentDidMount() {
    try {
      const products: Product[] = await RNIap.getProducts(itemSkus);
      this.setState({ products });
    } catch(err) {
      console.warn(err); // standardized err.code and err.message available
    }
  }
Each product returns from getProducts() contains:
Purchase
The flow of the
purchasehas been renewed by the founding in issue #307. I've decided to redesign thePurchase Flowto not rely onPromiseorCallback. There are some reasons not to approach in this way:
- There may be more than one response when requesting a payment.
- Purchases are inter-session
asynchronuousmeaning requests that are made may take several hours to complete and continue to exist even after the app has been closed or crashed. - The purchase may be pending and hard to track what has been done (example).
- Thus the Billing Flow is an
eventpattern rather than acallbackpattern.
Once you have called getProducts(), and you have a valid response, you can call requestPurchase(). Subscribable products can be purchased just like consumable products and users can cancel subscriptions by using the iOS System Settings.
Before you request any purchase, you should set purchaseUpdatedListener from react-native-iap. It is recommended that you start listening to updates as soon as your application launches. And don't forget that even at launch you may receive successful purchases that either completed while your app was closed or that failed to be finished, consumed or acknowledged due to network errors or bugs.
import RNIap, {
  purchaseErrorListener,
  purchaseUpdatedListener,
  type ProductPurchase,
  type PurchaseError
} from 'react-native-iap';class RootComponent extends Component<*> {
  purchaseUpdateSubscription = null
  purchaseErrorSubscription = null  componentDidMount() {
    RNIap.initConnection().then(() => {
      // we make sure that "ghost" pending payment are removed
      // (ghost = failed pending payment that are still marked as pending in Google's native Vending module cache)
      RNIap.flushFailedPurchasesCachedAsPendingAndroid().catch(() => {
        // exception can happen here if:
        // - there are pending purchases that are still pending (we can't consume a pending purchase)
        // in any case, you might not want to do anything special with the error
      }).then(() => {
        this.purchaseUpdateSubscription = purchaseUpdatedListener((purchase: InAppPurchase | SubscriptionPurchase | ProductPurchase ) => {
          console.log('purchaseUpdatedListener', purchase);
          const receipt = purchase.transactionReceipt;
          if (receipt) {
            yourAPI.deliverOrDownloadFancyInAppPurchase(purchase.transactionReceipt)
            .then( async (deliveryResult) => {
              if (isSuccess(deliveryResult)) {
                // Tell the store that you have delivered what has been paid for.
                // Failure to do this will result in the purchase being refunded on Android and
                // the purchase event will reappear on every relaunch of the app until you succeed
                // in doing the below. It will also be impossible for the user to purchase consumables
                // again until you do this.
                if (Platform.OS === 'ios') {
                  await RNIap.finishTransactionIOS(purchase.transactionId);
                } else if (Platform.OS === 'android') {
                  // If consumable (can be purchased again)
                  await RNIap.consumePurchaseAndroid(purchase.purchaseToken);
                  // If not consumable
                  await RNIap.acknowledgePurchaseAndroid(purchase.purchaseToken);
                }                // From react-native-iap@4.1.0 you can simplify above `method`. Try to wrap the statement with `try` and `catch` to also grab the `error` message.
                // If consumable (can be purchased again)
                await RNIap.finishTransaction(purchase, true);
                // If not consumable
                await RNIap.finishTransaction(purchase, false);
              } else {
                // Retry / conclude the purchase is fraudulent, etc...
              }
            });
          }
        });        this.purchaseErrorSubscription = purchaseErrorListener((error: PurchaseError) => {
          console.warn('purchaseErrorListener', error);
        });
      })
    })
  }  componentWillUnmount() {
    if (this.purchaseUpdateSubscription) {
      this.purchaseUpdateSubscription.remove();
      this.purchaseUpdateSubscription = null;
    }
    if (this.purchaseErrorSubscription) {
      this.purchaseErrorSubscription.remove();
      this.purchaseErrorSubscription = null;
    }
  }
}
Then define the method like below and call it when user press the button.
requestPurchase = async (sku: string) => {
    try {
      await RNIap.requestPurchase(sku, false);
    } catch (err) {
      console.warn(err.code, err.message);
    }
  }  requestSubscription = async (sku: string) => {
    try {
      await RNIap.requestSubscription(sku);
    } catch (err) {
      console.warn(err.code, err.message);
    }
  }  render() {
    ...
      onPress={() => this.requestPurchase(product.productId)}
    ...
  }
New Purchase Flow
Most likely, you’ll want to handle the “store kit flow”[2], which happens when a user successfully pays after solving a problem with his or her account — for example, when the credit card information has expired.
For above reason, decided to remove buyProduct and use requestPurchase instead which doesn't rely on promise function. The purchaseUpdatedListener will receive the success purchase and purchaseErrorListener will receive all the failure result that occured during the purchase attempt.
Finishing a Purchase
Purchases will keep being emitted to your purchaseUpdatedListener on every app relaunch until you finish the purchase.
Consumable purchases should be consumed by calling consumePurchaseAndroid() or finishTransactionIOS(). Once an item is consumed, it will be removed from getAvailablePurchases() so it is up to you to record the purchase into your database before calling consumePurchaseAndroid() or finishTransactionIOS().
Non-consumable purchases need to be acknowledged on Android, or they will be automatically refunded after a few days. Acknowledge a purchase when you have delivered it to your user by calling acknowledgePurchaseAndroid(). On iOS non-consumable purchases are finished automatically but this will change in the future so it is recommended that you prepare by simply calling finishTransactionIOS() on non-consumables as well.
finishTransaction() works for both platforms and is recommended since version 4.1.0 or later. Equal to finishTransactionIOS + consumePurchaseAndroid and acknowledgePurchaseAndroid.
Restoring Purchases
You can use getAvailablePurchases() to do what's commonly understood as “restoring” purchases.
If for debugging you want to consume all items, you have to iterate over the purchases returned by getAvailablePurchases(). Beware that if you consume an item without having recorded the purchase in your database the user may have paid for something without getting it delivered and you will have no way to recover the receipt to validate and restore their purchase.
getPurchases = async () => {
    try {
      const purchases = await RNIap.getAvailablePurchases();
      const newState = { premium: false, ads: true }
      let restoredTitles = [];      purchases.forEach(purchase => {
        switch (purchase.productId) {
        case 'com.example.premium':
          newState.premium = true
          restoredTitles.push('Premium Version');
          break        case 'com.example.no_ads':
          newState.ads = false
          restoredTitles.push('No Ads');
          break        case 'com.example.coins100':
          await RNIap.consumePurchaseAndroid(purchase.purchaseToken);
          CoinStore.addCoins(100);
        }
      })      Alert.alert('Restore Successful', 'You successfully restored the following purchases: ' + restoredTitles.join(', '));
    } catch(err) {
      console.warn(err); // standardized err.code and err.message available
      Alert.alert(err.message);
    }
  }
Returned purchases is an array of each purchase transaction with the following keys:
Receipt validation
Since react-native-iap@0.3.16, support receipt validation.
With IAPHUB
IAPHUB is a service that takes care of the ios/android receipt validation for you, you can set up webhooks in order to get notifications delivered automatically to your server on events such as a purchase, a subscription renewal…
You can use it by calling the API manually to process your receipt or use the react-native-iaphub module that is just a wrapper of react-native-iap with IAPHUB built-in.
With Google Play
For Android, you need separate json file from the service account to get the access_token from google-apis, therefore it is impossible to implement serverless.
You should have your own backend and get access_token. With access_token you can simply call validateReceiptAndroid() we implemented. Further reading is here or refer to example repo.
With App Store
Currently, serverless receipt validation is possible using validateReceiptIos().
- The first parameter, you should pass
transactionReceiptwhich returns afterbuyProduct(). - The second parameter, you should pass whether this is
testenvironment. Iftrue, it will request tosandboxandfalseit will request toproduction.
const receiptBody = {
    'receipt-data': purchase.transactionReceipt,
    'password': '******'
  };
  const result = await RNIap.validateReceiptIos(receiptBody, false);
  console.log(result);
For further information, please refer to guide.
Sometimes you will need to get the receipt at times other than after purchase. For example, when a user needs to ask for permission to buy a product (Ask to buy flow) or unstable internet connections.
For these cases they have a convenience method getReceiptIOS() which gets the latest receipt for the app at any given time. The response is base64 encoded.
Testing
We check in-app purchase functionality in the app by making a sample purchase of a product by any user.
For iOS, we create a sandbox tester for that.
Go to “User & Roles Section” in iTunes, select the “Sandbox Tester” tab and add a new user as a tester with some basic details. With the credentials of that user you can purchase any product on iOS without paying any real money and test in app purchase functionality in the iOS app.
To add a tester account in Android, open play store console, go to the “Settings” section and then the “Account Detail” tab, scroll down to “License Testing” and add the email of the user you want to add as a tester. You can test in-app purchase functionality in the Android app using these tester accounts credentials.
One more thing to add: To check in-app purchasea, your Android build must be in release mode — you can’t test in debug build.
Service Fees
Ios
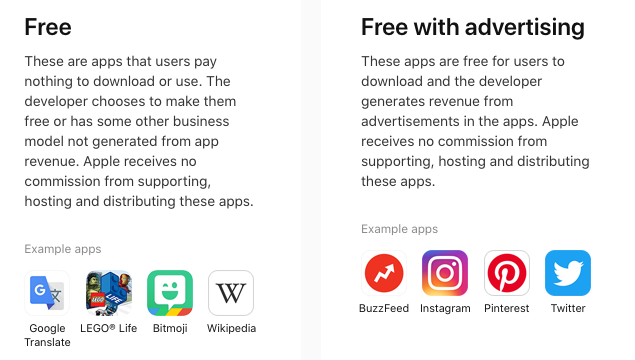

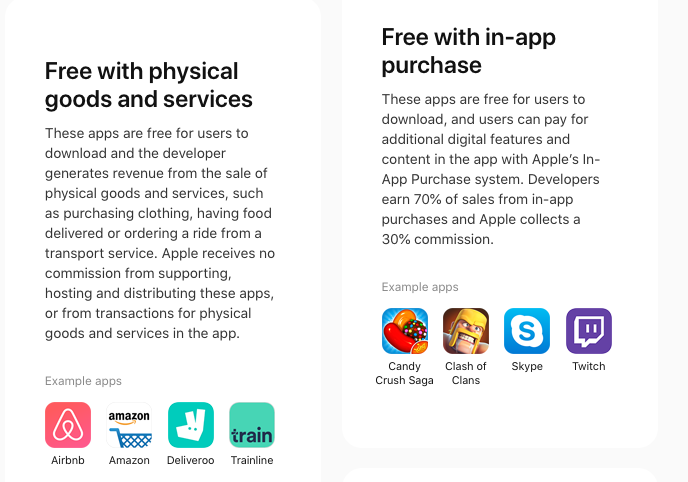
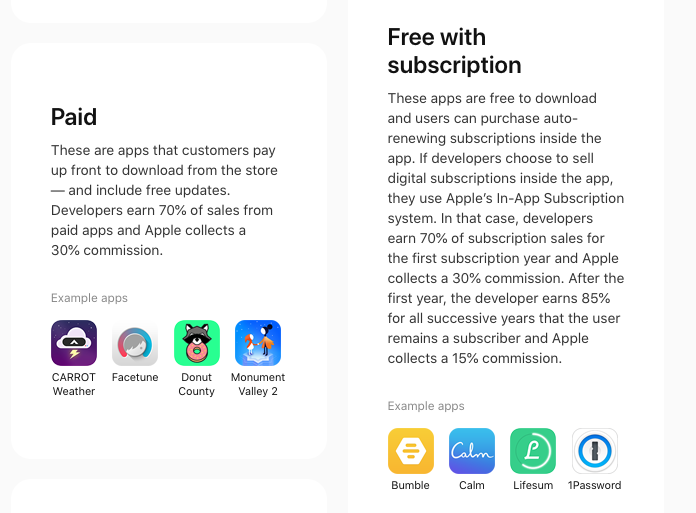
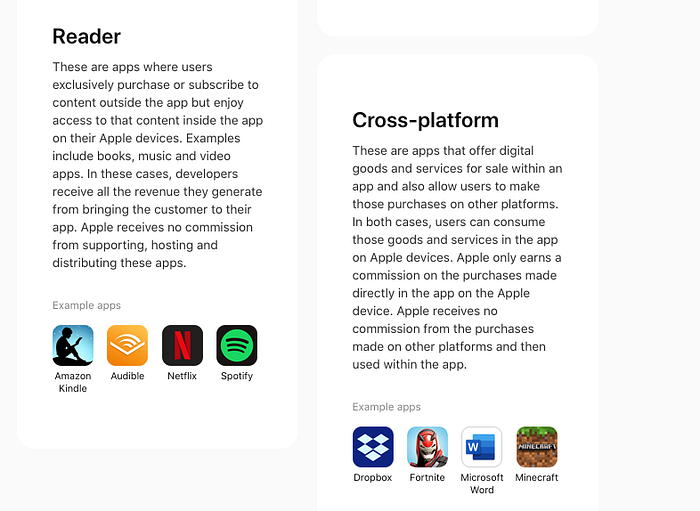
Visit for more info : https://www.apple.com/ie/ios/app-store/principles-practices/
Android
For apps and in-app products offered through Google Play, the service fee is equivalent to 30% of the price. You receive 70% of the payment. The remaining 30% goes to the distribution partner and operating fees.
As of January 1, 2018, the service fee for subscription products decreases to 15% for any subscribers you retain after 12 paid months. If a subscriber has been active as of this date, that time will be counted. For example, if a subscriber has been active for 4 months, the service fee will be reduced to 15% after 8 more paid months.
The following count towards a user’s 12 paid months:
- Subscribers within a grace period
- Subscribers who recover from an account hold, grace period, pause, or subscription restore
- Subscribers with introductory pricing
- Subscribers who upgrade or downgrade to a different plan
- Subscribers who re-sign up within two months of canceling
The following don’t count towards a user’s 12 paid months:
- Free trials
- Refunded purchases
- Time in account hold
- Deferred time (using deferred billing via the Google Play Developer API)
Visit for more info : https://support.google.com/googleplay/android-developer/answer/112622?hl=en
How much does a Google & Apple Developer Account Cost?
All official app stores require you to buy a developer account to be able to publish apps. The prices for each store differ significantly.
- Google developer account needs a one-time fee of 25$.
Once you create an account, you have to wait 48 hours for Google to confirm your account. For free apps, Google charges no extra fee but it does take 30% revenue for paid apps on the platform.
- Apple developer account costs 99$/ year.
Apple also gives an upgraded Enterprise account which costs 299$ per year. Apple may waive your fee if all the apps that you create and publish are free. Apps belonging to NPOs, government organizations also have their fees waived off.
Note: Fees may differ regionally.
Reference
- https://medium.com/better-programming/react-native-in-app-purchase-subscription-bb7ad18ec5a0
- https://medium.com/@rossbulat/react-native-subscriptions-with-in-app-purchases-setup-fdaf3863e07f
- https://developer.apple.com/
- https://support.google.com/
Thank You


